
Ubiquiti EdgeRouter Lite Setup Part 1: The Basics
A few months back I picked up an Ubiquiti EdgeRouter Lite as I started the process of upgrading some of the aging network equipment in my home. So far I’m finding this to be a very substantial upgrade to the typical consumer-grade home networking equipment at a reasonable price. Getting this device configured was a bit of work though, so I’m documenting what a learned here - mostly for my reference, but also in case it proves useful to anyone else.
Please note that for the most part I’m writing this from memory, so there may be mistakes. Since my ERL is currently in use I haven’t been able to validate the configuration steps I provide. If you see mistakes, have problems with any of the steps, or have suggestions for better ways to do things please let me know.
For reference I’ll maintain a collection of links to all my posts about EdgeRouter Lite configuration here, updating it as new posts are added.
- Part 1: The Basics
- Part 2: Firewall Setup
- Part 3: VLAN Setup
- Part 4: IPv6 Setup
- Part 5: OpenVPN Setup
- Part 6: Odds and Ends
About the EdgeRouter Lite
If all you’re familiar with is the standard consumer home networking equipment, it may take a bit of reorienting to understand the role of the ERL. In consumer parlance a router is typically a combination of a router (connects networks together), a switch (connects machines within a network), and a wireless access point (allows wireless clients to connect to the network). The ERL serves only the router function, but it does this with better performance, more flexibility, and (hopefully) better reliability than consumer equipment. It also has a decent CLI, which will be used for almost all the configuration examples in these posts.
Network Configuration
The typical home network consists of just a single network. I work from home though, and I keep my office network separated from our home network to protect my work assets from any potential compromise of my home network. Previously this was done by attaching a second NAT router with firewall behind the router that connected my home from the internet. With the ERL (in combination with a managed switch) I can instead use VLANs to separate my networks for something that looks more like this:
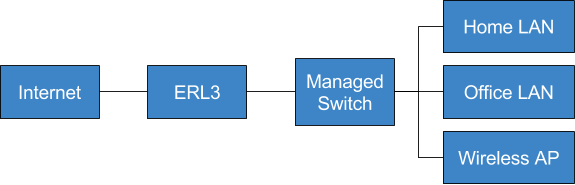
In these posts we’ll gradually work towards setting up the EdgeRouter Lite for this setup.
Initial ERL Setup via the Web UI
Consult the EdgeRouter Lite User Guide for information on accessing the EdgeOS configuration interface for the first time. Bascially, the steps are: connect a machine to the eth0 port on the ERL, manually configure your machine to have an address in the 192.168.1.x subnet, then point your web browser at 192.168.1.1. This will bring up the configuration interface in your browser.
While I prefer the CLI for most of my configuration, the ERL’s web interface contains a handful of wizards for common setups. If you wish to use one of the wizards it is important that this be the first configuration step you perform, as any change to the configuration at all seems to make the ERL insist that you reset to the default configuration before using the wizard.
Once this is done and the ERL reboots, it is imperative that your next step is to change the default password, or better yet add a new user and delete the default user altogether.
Using the CLI
You can access the CLI either within the web UI or over ssh (my preferred method). The OS on the ERL is called EdgeOS and is based on Vyatta, so if you’re familiar with Vyatta the EdgeOS CLI will be familiar. You’ll probably want to consult the EdgeOS User Guide to get familiar with the CLI (refer to Appendix A), but I’ll mention a few of the basics here.
Once logged into the CLI you’re presented with a shell in a Debian-based environment. The first thing to know is that at any time typing ? will bring up context-sensitive help about valid commands and syntax. Typing ? a second time will show more detailed help. The shell also includes context-sensitive tab completion.
There is a show command which can be used to display information about the system. For example, show interfaces displays information about the network interfaces in the system.
To make changes to the configuration you must enter configuration mode by entering the configure command. Configuration mode has show and set commands for displaying and modifying configuration variables, respectively, along with an assortment of other commands.
The configuration itself is hierarchical, with sections which may contain settings or subsections. For example there is a interfaces section which holds the configurations for network interfaces and a firewall section which contains the firewall rules.
Changes made while in configuration mode are staged until they are committed with the commit command, at which point they go into effect, or they can be discarded using the discard command. To save the changes to the default configuration use the save command, and the exit command will return to operational mode. The default configuration is stored in a plain text file at /config/config.boot.
Setting Up WAN+LAN Using the CLI
My setup uses eth0 to connect to the internet and eth2 for my LANs. We’ll start with a basic setup to provide NAT and a basic firewall on the WAN interface and a single network on the LAN interface.
First, let’s set up the firewall to only allow established connections into the network. We’ll go into more details about firewall setup in the next post, but for now note thatt we actually create two sets of rules. One is named WAN_IN and applies to packets coming in the WAN interface destined for other interfaces, and the other is named WAN_LOCAL and applies to packets coming in the WAN interface destined for the router itself.
$ configure
# set firewall all-ping enable
# set firewall broadcast-ping disable
# set firewall ipv6-receive-redirects disable
# set firewall ipv6-src-route disable
# set firewall ip-src-route disable
# set firewall log-martians enable
# set firewall receive-redirects disable
# set firewall send-redirects enable
# set firewall source-validation disable
# set firewall syn-cookies enable
# set firewall name WAN_IN default-action drop
# set firewall name WAN_IN enable-default-log
# set firewall name WAN_IN rule 1 action accept
# set firewall name WAN_IN rule 1 description "Allow established connections"
# set firewall name WAN_IN rule 1 state established enable
# set firewall name WAN_IN rule 1 state related enable
# set firewall name WAN_IN rule 2 action drop
# set firewall name WAN_IN rule 2 log enable
# set firewall name WAN_IN rule 2 description "Drop invalid state"
# set firewall name WAN_IN rule 2 state invalid enable
# set firewall name WAN_LOCAL default-action drop
# set firewall name WAN_LOCAL enable-default-log
# set firewall name WAN_LOCAL rule 1 action accept
# set firewall name WAN_LOCAL rule 1 description "Allow established connections"
# set firewall name WAN_LOCAL rule 1 state established enable
# set firewall name WAN_LOCAL rule 1 state related enable
# set firewall name WAN_LOCAL rule 2 action drop
# set firewall name WAN_LOCAL rule 2 log enable
# set firewall name WAN_LOCAL rule 2 description "Drop invalid state"
# set firewall name WAN_LOCAL rule 2 state invalid enable
Next, set up eth0 as the WAN interface and set up NAT.
# set interfaces ethernet eth0 description WAN
# set interfaces ethernet eth0 address dhcp
# set interfaces ethernet eth0 firewall in name WAN_IN
# set interfaces ethernet eth0 firewall local name WAN_LOCAL
# set service nat rule 5010 description "Masquerade for WAN"
# set service nat rule 5010 outbound-interface eth0
# set service nat rule 5010 type masquerade
Finally, set up eth2 as the LAN interface with DHCP, and listen for DNS queries for clients on this network.
# set interfaces ethernet eth2 description LAN
# set interfaces ethernet eth2 address 192.168.1.1/24
# set service dhcp-server disabled false
# set service dhcp-server shared-network-name LAN authoritative enable
# set service dhcp-server shared-network-name LAN subnet 192.168.1.0/24 default-router 192.168.1.1
# set service dhcp-server shared-network-name LAN subnet 192.168.1.0/24 dns-server 192.168.1.1
# set service dhcp-server shared-network-name LAN subnet 192.168.1.0/24 lease 86400
# set service dhcp-server shared-network-name LAN subnet 192.168.1.0/24 start 192.168.1.150 stop 192.168.1.254
# set service dns forwarding listen-on eth2
Now commit and save the changes.
# commit
# save
# exit
Backing Up and Restoring Your Configuration
Once you have something that’s working it’s important to back up the configuration file. It’s possible to save the configuration to another host using the save command, but this is one case where I prefer to use the web UI. Once logged in, click on the System button on the bottom of the screen, find the Back Up Config section, and click the Download button. The configuration can be restored from a backup here as well.
The EdgeRouter supports revisioning of the configuration, but I prefer to just store revisions in my own git repository. More information about managing the config file can be found here.
Key-Based SSH Login
It’s more convenient and more secure to log into ssh using public key authentication than with password authentication. I’ll assume you’re already familiar with key-based authentication, if not a quick search should turn up plenty of resources.
The first step is to copy your ssh public key to the ERL. For example, using scp on your local machine:
$ scp ~/.ssh/id_rsa.pub <ip-of-erl>:/tmp After this you need to associate the public key with your user on the ERL. Log into the ERL and run these commands:
$ configure
# loadkey <user> /tmp/id_rsa.pub
# commit
# save
# exit
In theory this should be all that is needed, but I had to do one additional manual step. For some reason my home directory and some of its contents were owned by uid 1000, which was not the id of my user. Key-based ssh login would not work until I fixed this. On the ERL run:
$ sudo chown -R <user> /home/<user> Now you should be able to log out and then log back in using your ssh key.
That’s it for part 1. In part 2 we’ll go into detail about setting up the firewall.
Comments